Wednesday, June 29, 2016

Making Operations Easier for NSX Distributed Firewall

Operations isn't a very sexy topic, but having been there;done that, I know how important it is to an organization. The way a product makes itself easier to support, the better. With that in mind, I'd like to share an enhancement VMware NSX has made to the Central CLI.

In NSX the Distributed Firewall (DFW) policy is enforced on the ESXi host where the guest resides. This avoids hairpinning of traffic and allows horizontal scale while securing traffic as close to the source as possible. The DFW logs created are stored locally on the host instead of being centralized to the NSX Manager or another location. Until NSX 6.2.3 collecting DFW logs meant customers needed to determine which host the VM is on, connect to the host and get the log and turn around and upload it to the Global Support Services (GSS) for analysis. Not a difficult process but there was an opportunity for improvement.

In NSX 6.2 we added a feature called Central CLI which enabled customers to connect to the NSX Manager via SSH and issue commands that would go out and grab whatever information you told it to collect and then display it from the single SSH session. This in and of itself was an improvement but we didn't stop there. In NSX 6.2.3 the ability to collect a support bundle for DFW logs from a host and copy them (via SCP) to a target server was added.

Note: As of NSX 6.2.3 this is a command that must be executed in enable mode of NSX Manager.

Here's the new command in action where I'll have the NSX Manager collect the support logs from host 49, bundle them up into a compressed TAR file and copy them to a CentOS host on my network.

dc1-nsxmgr01> ena
Password:
dc1-nsxmgr01# export host-tech-support host-49 scp root@192.168.10.9:/home/logs/
Generating logs for Host: host-49...
scp /tmp/VMware-NSX-Manager-host-49--dc1-compute03.fuller.net--host-tech-support--06-28-2016-16-29-31.tgz root@192.168.10.9:/home/logs/
The authenticity of host '192.168.10.9 (192.168.10.9)' can't be established.
ECDSA key fingerprint is SHA256:jiutMmcrUKH9fZgsuR8VfNoQEz8oq0ubVPATeAXMoxg.
Are you sure you want to continue connecting (yes/no)? yes
Warning: Permanently added '192.168.10.9' (ECDSA) to the list of known hosts.
root@192.168.10.9's password:
dc1-nsxmgr01#


We can see it triggered to creation of the logs on the host and then used SCP to copy it to the destination (192.168.10.9 in my network).

If we look on the destination server we can see the file.

[root@lab-tools logs]# ls -l
total 932
-rw-r--r--. 1 root root 952931 Jun 28 16:40 VMware-NSX-Manager-host-49--dc1-compute03.fuller.net--host-tech-support--06-28-2016-16-40-31.tgz
[root@lab-tools logs]#


So there you have it, an easier way to collect support logs.  I'll have an additional blog on how to track a VM down that has been moving around due to DRS. 

Let me know if you like posts with an operational focus.

Tuesday, June 28, 2016

On Intel NUCs and the value of EVC

As I mentioned in the previous post, I am adding an Intel NUC to my home lab. Here is where the *fun* begins.

I added the NUC to my cluster and tried to vMotion a machine to it - worked like a champ!  I tried another machine and hit this issue.

The way I read this was that the NUC didn't support AES-NI or PCLMULQDQ. Oh man.  Did I buy the wrong unit?  Is there something wrong with the one I have?!  I started searching, and everything points to the NUC supporting AES-NI. Did I mention I moved the NUC to the basement? Yeah, there is no monitor down there, so I brought it back up to the office and connected it up.  I went through every screen in the BIOS looking for AES settings and turned up nothing. I opened a case with Intel and also tried their @Intelsupport Twitter account.  We had a good exchange where they confirmed the unit supported AES-NI and they even opened a case for me on the back end.  I will say given the vapid response from most vendors, @Intelsupport was far ahead of the rest - good job! This part of the story spans Sunday off and on and parts of Monday.

If you've ever taken a troubleshooting class or studied methodology, you might notice a mistake I made. Instead of reading the whole error message and *understanding* it I locked in on AES-NI and followed that rat hole far too long. Hindsight being 20/20 and all I figured I'd share my pain in the hopes it'll help someone else avoid it. Now, back to my obsession.....

It's now Tuesday morning and I decided I would boot the NUC to Linux and verify the CPU supported AES myself. I again used Rufus to create a bootable Debian USB and ran the "lscpu" command where I could see "aes" in the jumble of text.  Hint - use grep for aes and it'll highlight it in red or use "grep -m1 -o aes /proc/cpuinfo"  I verified it was there so decided I would try a similar path through ESXi.  I found this KB Checking CPU information on an ESXI host but the display for the capabilities is pretty obtuse.  As I sat there thinking about where to go next, I looked at the error message and decided I should read KB vMotion/EVC incompatibility issues due to AES/PCLMULQDQ and it hit me.
My new host needed to be "equalized" with my older hosts.  A few clicks and I configured Enhanced vMotion Compatibility (EVC) set to a baseline of Nehalem CPU features.


Now I can vMotion like a champ and life is good.  The NUC is back in the basement and has VMs on it running happily.  Two lessons learned - RTFEM (Read the freaking error message) and the VMware Knowledge Base (KBs) are a great resource.  At the end of the day, I learned a lot and ultimately, that's what it's all about, right?  :)

Intel NUC Added to the home lab

I am excited about the newest addition to the home lab which is an Intel NUC. Specifically I have a NUC6 with an i3 processor, 32GB of RAM and a 128GB SSD. I've been looking for a smaller footprint for the lab for some time and the NUC kept rising to the top of the list. I looked around at other options and the NUC just seemed the simplest way to go.  I had originally hoped for a solution to get past the 32GB RAM limitation but after pricing 64GB kits, I decided 32GB would do the trick.

My current lab is 2 Dell C1100 (CS-24TY) servers I bought on eBay last year. These servers have 72GB of RAM and boot from ESXi on a USB stick with no local disk. They've done the job well but are power hungry. I knew they'd suck the watts down but didn't realize how much until I connected a Kill-a-watt meter to the plug for the UPS and saw I hovered around 480w between the two servers and a Cisco 4948 switch. While power isn't super expensive where I live, it adds up and I had noticed and increase in our power bill. Thus, the drive for the NUC - not to mention the benefit of having a local SSD.

I ordered the NUC from Amazon and it was delivered and I finally had some free time to work on it Sunday. The box is heavier than I expected but comfortably so, not like a lead weight.  The build was easy after removing 4 captive screws from the base and popping in the RAM and SSD.

Here's what I ordered on Amazon

Ready to start

Once I popped the case open.

I used Rufus to create a bootable USB with ESXi and connected the NUC to one of my monitors.  I turned on the NUC and the only light was a blue LED on the "front" of the unit - it's a square so front is relative based on the stamp on the baseplate. Nothing on my monitor at all.  I made sure the connections were secure, power cycled the unit and started to wonder if I had a bad box. I was using a DisplayPort adapter to a VGA output but only saw "No signal" on the monitor. The NUC has a HDMI output but I don't have HDMI on my monitors.  I do have DVI so figured I'd give it a try and was rewarded with seeing my NUC boot.  Not sure why this was the case but I was eager to get started so didn't dig into it further.

My first attempt at installing ESXi was with 6.0 Update 1 and it didn't detect the NIC.  I read other blog posts about adding the driver but figured I would give ESXi 6.0 Update 2 a go. When it booted it found the NIC and we were up and grooving.

After ESXi was installed I decided to flash the BIOS to the current revision. It's been a while since I have spent much time in a BIOS (AMI anyone?) and was amazed that the Visual BIOS supports network connectivity, mouse and not nearly as obtuse as I remember! I downloaded the newest BIOS from Intel's site (0044 revision) and applied the update though I used the recovery method and not the GUI (old habits die hard). Easy as can be.
Now it was time to turn this thing up and really get cooking.  I moved the unit to the basement with the rest of the lab equipment because, well, what could go wrong? I had the right software, verified network connectivity and was all set.  Famous last words.

If you want to read about my pain - here's part 2.

Friday, June 24, 2016

NSX - Lots 'O Links

This is a personal list of links I have kept local, but thought I'd share with others as they are helpful, IMHO.

NSX 6.2.3 Active Directory Scaling Enhancements

One of the most common use cases for NSX is to provide a per-user firewall in an End User Computing (EUC) environment like VMware Horizon. This feature, called Identity Firewall (IDFW) allows admins the ability to leverage the group membership of a user to define firewall policy. For example, you can define a NSX Distributed Firewall Policy to allow members of the "Domain Admins" AD group to be able to use ping when they login while it is disabled for all other users.

A rule like this is created.
I defined the AD group by creating a new security group and then setting the criteria that "entity belongs to" and then selecting the Domain Admins group from the list.
Very cool, huh?  That's just the tip of the iceberg when it comes to NSX's security capabilities.  What I want to focus on is a capability we've added to NSX in 6.2.3 to help scale our IDFW implementation.

When a NSX manager is configured to integrate into and Active Directory domain, NSX pulls in user and group information to keep a local, secure, copy for quick lookups and validation. For many of our customers, once you have an AD account created, it is never removed even if you leave the organization. When you leave, they simply disable the account. AD sets a flag on the account to indicate it is disabled which in our use cases means it cannot be a valid account to login with. In the past we would have kept that account in our local copy even though it never would have been used. This means it is taking up resources and if a customer has thousands or tens of thousands of disabled users, it can have a negative impact on scalability.

To address this consideration, we added the ability to have the IDFW ignore disabled users and the good news is that to enable it, it's just a selection from the configuration. Piece of cake!  See below where this feature is disabled.

So how do you enable it? Simply click on the pencil icon and you'll see this.
Finish the configuration and you'll see this.

On a side note, event log access is not required and now you can skip the step via this new screen.
With that, you are all done and now your IDFW can scale higher by ignoring disabled user accounts.

If you are considering NSX in an EUC environment, then this design guide is for you - fresh off the press June 22, 2016.
NSX EUC Design Guide

Thursday, June 23, 2016

Upgrading NSX to 6.2.3 - Step by Step

With the release of NSX 6.2.3 a new set of capabilities and features are being introduced to the platform. Seeing how it's a big part of my job to know these new functions in and out I need to get some hands on.  To that end I have a home lab, which I'll blog about later, that I use to check it all out. Other colleagues have done a good job covering the "What's new in NSX 6.2.3" angle including these:
VMware.com NSX 6.2.3 Release Notes
Network Inferno 
Cloud Maniac

There are many more in the overall VMware ecosystem so I can't list them all.

So let's start with the upgrade process. First, the official document is here: VMware.com NSX 6.2 Upgrade Guide. You really should start there as I only cover scenarios that apply to my lab which is honestly, quite simple.  In my lab I am upgrading from NSX 6.2.2 to NSX 6.2.3 so not a huge jump in code or versions. If you are upgrading your environment, read the doc. Ok, now that I feel like I've done enough CYA, let's get into the good stuff. I'll spare you the details, but download the upgrade OVA from vmware.com and get it to a location reachable via the machine you'll use to drive the upgrade.

Our first step is to login to NSX Manager and go to the Upgrade page, fill in the details like below:

Once you hit continue, it'll start the upload process. Keep in mind that at this point the file is being placed onto the NSX Manager VM. You'll see this status window - it doesn't estimate time to completion or percentage uploaded but lets you know something is happening.
You will then see this page that lets you enable SSH to the NSX Manager and Opt In to the Customer Experience Improvement Program (CEIP).  I am sure some customers won't want to enable SSH or may not be allowed to due to organizational policy, but you lose easy access to the Central CLI if you don't so can't imagine not doing it.  Once you make your selections and click on Upgrade, the NSX Manager upgrade starts.
Remember, NSX Manager is the management plane for an NSX environment. Policy, network configuration, etc are defined here so there is no impact to the control plane/data plane of the NSX topology during this step at all. After the upgrade process has completed, you'll be back at the NSX Manager login page. Log back into the Manager and you can verify the new version like below.

Now that we have upgraded the management plane, let's do the control plane. For NSX a portion of the control plane are the 3 NSX controllers. This is especially important for customers using the network virtualization aspect of NSX or who are running the NSX-T product. Upgrading the controllers is easy. Login to the vCenter Web Interface, go to the Networking and Security page and then go to the Installation tab. You can see the NSX Manager shows there is an upgrade available for the controllers. Start the upgrade process when prompted.
Make sure your controller status looks good with 2 green boxes next to each controller.  You'll see the status show as Downloading when the upgrade is taking place.
This is a multi-step process and you can watch it progress. You can see my first controller is download complete and the process has moved on to the next controller.
Once the upgraded code has been pushed to all of the controllers, indicated as Download Complete, the actual upgrade process starts as you can see on the first controller with Upgrade in Process.

After the upgrade, the controllers reboot. The NSX controllers are configured in a cluster for scale and redundancy so this reboot process doesn't impact data plane traffic. Also note the red box status next to the other controllers as they lose communications with the rebooting one.
The process will continue through the other controllers until they are all happy and green.

Next, we need to upgrade the VIBs on the ESXi hosts. This can be done on a per-cluster basis to allow you the flexibility of scheduling the process when it makes sense for the business. Before we get started, let's take a look at the VIBs on one of my hosts and note the version (3521449).
These are the VIBs that are contain the data plane components. Now for you seasoned virtualization admins, this part is old news but is still cool for me to see. The VIB update does require the ESXi hosts to be rebooted and the best way to do this is to place the host in maintenance mode and let DRS move the VMs. This is so cool to watch (maybe I need to get out more) but once complete you can roll on.

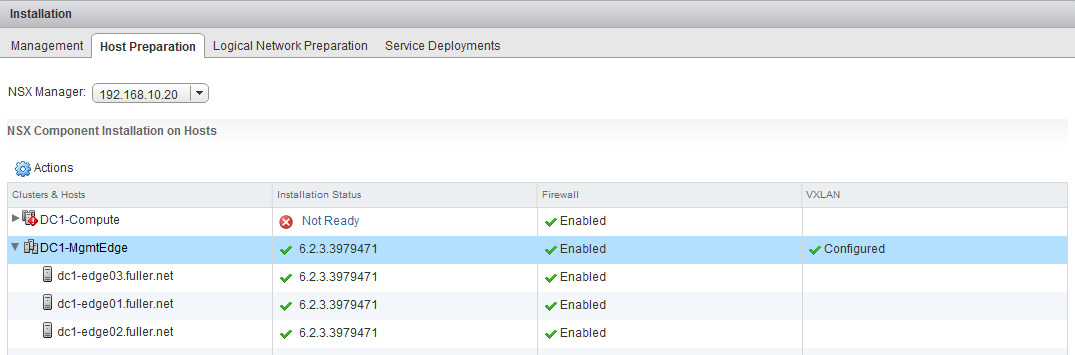
Go to the Host Preparation tab on the Installation page and it should look like this. Note, my DC1-Compute cluster is powered off at the moment, so normally this would look healthy.
Click Upgrade and let it fly. You'll see the status change as it progresses.  I have limited resources so had to manually take my hosts into and out of maintenance mode during the process to ensure I had enough resources to run NSX Manager and the controllers at any given time.
After the VIBs are upgraded, you can again verify them using esxcli like below. Note the new version 3960664.
Now everything is happy and shows as upgraded.
An optional step that can be done in 6.2.3 is to change the VXLAN UDP port being used.
One last step to go and that is to upgrade the various Edge components - both Distributed Logical Router (DLR) and Edge Services Gateway (ESG). Click on the NSX Edges tab and you'll see this screen.
You can upgrade multiple edges at the same time if you want. Remember the Edges are a big part of the data plane and some of the control plane. During the upgrade there will be disruptions so plan accordingly. Maybe a future blog post will dig into the details of the upgrade process.  :)
When complete, you'll see they are all deployed and no blue arrow (indicating an upgrade available).
There you go.  That was the process I used to upgrade my setup.  Now I get to play with the new features and will blog about some of them coming up.

Hope this was helpful.


Wednesday, June 22, 2016

VMworld 2016 - Let's Do This

As you may know, I submitted multiple session proposals for VMworld 2016. After the voting process was complete, internal distillation of overlapping sessions and whatever other considerations are done, I received multiple emails. They all had the title of "Your VMworld 2016 Session Proposal" so no quick hints as to what they said. The first was the bad news - one of my sessions wasn't selected at all.  No surprise I didn't think that session had much of a chance but it never hurts to try. Another email indicated that two of my submissions had been combined into customer speaking panels.  This is great news as my customers get a chance to speak and don't have to develop any content!  Win for them!

The last email was that the last session had been selected for VMworld in both the US and Europe! Vegas and Barcelona, baby!  I'll be discussing "Practical NSX Distributed Firewall Policy Creation" in session 7568. Not only will I be speaking, but one of my customers will be sharing his real world experiences as well.

The abstract for the session reads as: "The Distributed Firewall (DFW) within NSX is a powerful tool capable of providing industry leading micro-segmentation. One of the common considerations customers have is how to best create a zero trust security policy in their existing environment where application ports and protocols used may not be well understood. This session will discuss multiple examples of how customers have successfully addressed these needs with tools such as Netflow, syslog, flow monitor and port mirror."

This will be a fun session and I can't wait to deliver it in August and October!  To add to the joy, I've submitted a session for vBrownBag, too.  Should be a fun and busy conference!


The entire VMworld content catalog can be found here: http://www.vmworld.com/uscatalog.jspa

There are so many good sessions to pick from and I know even if I tried, I won't be able to see them all.  I'm already eager to see the recordings that will be posted after the event!

See you in Las Vegas and/or Barcelona!